How to integrate a django-select2 component in Django Admin
In a project we had a select box that will probably contain more than a hundred of results, and it will be very difficult for users to select the right one without typing. So we decided to implement a django-select2 widget instead.
I am not a Python expert, nor a Django or Django Admin expert. What you read here is what i learned along the way. It may be inaccurate or imprecise but I try to explain all the inner questions I got to myself.
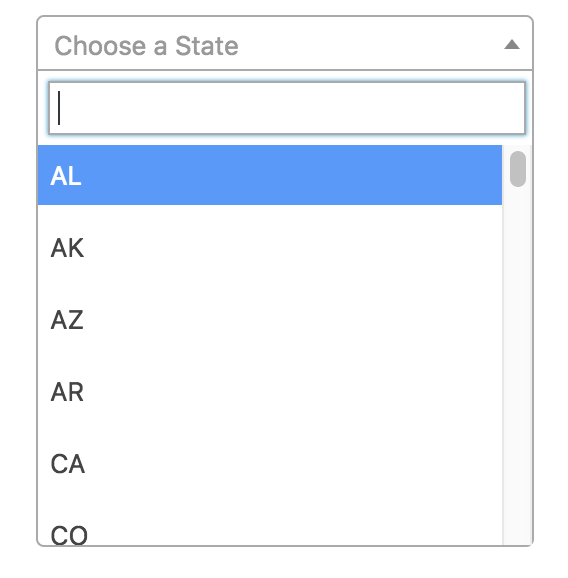
First of all, what is a Select2 ? This one:

What is Django? Django is a Python framework to build MVC websites.
And what is Django Admin? It is a way to build admin consoles for models in your domain. It supports users, groups, permissions, inserts, updates, lists, custom actions, etc. I think that alone it is worth the price of the whole stack. The major downside is that you end up configuring it instead of programming. And, you'll spend a lot of time in their documentation.
If you only have to add autocomplete on Model pages (like, the creation of an entity), probably autocomplete_fields is enough. But if you need something more specialized, like a custom form, probably you need to add select2 by yourself. (No, I couldn't find a way to re-use the same select2 component that is in django admin, sorry.)
So, in order to integrate a select2 in django admin, here's the high level description of what to do:
install django-select2
I used pipenv so pipenv install django-select2
Add django_select2 to INSTALLED_APPS
# settings.py
INSTALLED_APPS = [
    ...
    "django_select2",
]
Add django_select2 urls
In the main urls.py, the same directory where settings.py is, add this line:
# urls.py
urlpatterns = [
    ...
    path("select2/", include("django_select2.urls")),
]
Why: it will be used by the dropdown to fetch the data.
Specify a cache for the component
Install and use a cache to get the data for the Select2 component. We were already using REDIS so here's our configuration.
First install django-redis:
pipenv install django-redisThen add the configuration:
# settings.py

CACHES = {
    "default": {
        "BACKEND": "django.core.cache.backends.locmem.LocMemCache",
        "LOCATION": "unique-snowflake",
    },
    "select2": {
        "BACKEND": "django_redis.cache.RedisCache",
        "LOCATION": "redis://redis:6379/2",
        "OPTIONS": {
            "CLIENT_CLASS": "django_redis.client.DefaultClient",
        },
    },
}

SELECT2_CACHE_BACKEND = "select2"Why: I only needed select2 cache, but Django then complains that there's no default cache, that's why I had to add the default one. You may want to use another kind of cache, see django docs.
Regarding JQuery
Django Admin adds and uses JQuery, but it namespaces it under django.JQuery. This is problematic because the select2 javascript file expects jquery to be present in the global scope. So I will re-add it when defining the component. You'll see how in the next paragraph.
Add the generic widget
We've decided to create a generic widget to be inherited by all other select2 widgets that will be created over time.
So I created a new file called form_components.py containing:
from django_select2 import forms as s2forms

class BaseAutocompleteSelect(s2forms.ModelSelect2Widget):
    class Media:
        js = ("admin/js/vendor/jquery/jquery.min.js",)

    def __init__(self, **kwargs):
        super().__init__(kwargs)
        self.attrs = {"style": "width: 300px"}

    def build_attrs(self, base_attrs, extra_attrs=None):
        base_attrs = super().build_attrs(base_attrs, extra_attrs)
        base_attrs.update(
            {"data-minimum-input-length": 0, "data-placeholder": self.empty_label}
        )
        return base_attrs
You may see that the inner class Media readds the jquery as specified before.
In the constructor I specified a fixed width, feel free to adjust the style as you want.
In the build_attrs method we add all the select2 options you may want to override. The list of options, to write in kebab-case, is here. The method build_attrs must return a dict of properties.
Specialize the widget by sublcassing it
Now we are ready to create a widget that subclasses our BaseAutocompleteSelect class. Here is an example:
## remember to add the imports!

class BookAutocompleteWidget(BaseAutocompleteSelect):
    empty_label = "-- select book --"
    search_fields = ("name__icontains",)
    queryset = Book.objects.filter(
        type="Romance"
).order_by("id")- The empty_label contains the label that is shown when the dropdown is closed and no value is selected.
search_fieldsis how the search has to be done. This depends on the model.querysetis the list of objects on whom the query is performed. It seems that django-select2 launches a warning if there's no "order_by" that's why I added one.
Use the widget in a form
And now you can add the Widget in the form:
class BookForm(forms.Form):
    ...
    book = forms.ModelChoiceField(
        label="Book: ",
        widget=BookAutocompleteWidget,
        queryset=Book.objects.filter(
            type="Romance"
        )
    ...
That's it!
What confused me the most?
First thing: how to use or specialize the method ModelSelect2Widget.build_attrs was a bit confusing for me. This is not described very well in documentation, at least for a non-python expert.
Second: Instead of using forms.ModelChoiceField i accidentally used forms.ChoiceField first. The missing Model prefix makes a substantial difference, infact the Form is not automatically valid when a value is selected. Also, the error I was getting was related to a missing property on another field. What a confusion! Had to debug django in order to understand what was going on. Anyway, if you want to go that way, you have to write custom code to validate the form.
In order to make the form automagically valid, I had to use the ModelChoiceField and specify the queryset again. This is because the ModelChoiceField verifies that the chosen element belongs to this queryset. This way it declares the form valid.
